Table of Contents
Creating an accessible bathroom layout is all about providing comfort, independence, and safety for everyone, especially people with disabilities and the elderly. Designing a space with accessible bathroom dimensions that are compliant with the Americans with Disabilities Act allows individuals to maintain their dignity and autonomy, greatly enhancing their quality of life.
So whether you’re designing a senior-friendly bathroom for a family member or renovating to create ADA-compliant bathrooms for a public space, understanding the necessary dimensions is crucial for accessibility. Today’s blog will provide tips and tricks for building an accessible bathroom design, including essential dimensions for optimal accessibility.
Dimension and Space Requirements for an Accessible Bathroom
Designing an accessible bathroom layout involves considering various spatial requirements. You must ensure that all fixtures are usable and manoeuvrable by individuals with disabilities. Let’s break these down.
General Space Requirements
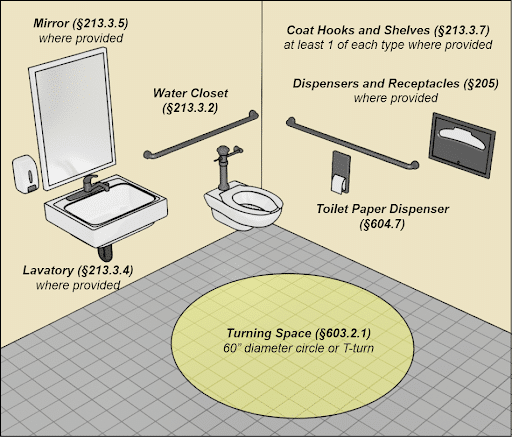
First and foremost, you need to provide adequate manoeuvring space within the bathroom. Generally, accessible bathroom dimensions should be 5 × 4.6 feet (60 x 56 inches) for minimum clearance, with extra space for fixture installations.
Depending on the number and types of fixtures that will be used, more space might be required to create a larger bathroom. Sufficient doorway clearance, turning areas, and fixture clearances are vital for people who rely on mobility devices. Ensuring a turning space of at least 60 inches in diameter is essential for comfortable manoeuvrability.
Doors and Entryways
For individuals with mobility challenges, the bathroom entry should provide a worry-free experience. Because the standard wheelchair is between 24–27 inches, an accessible bathroom requires a wide doorway, at least 32 inches to fully accommodate those with mobility issues.

Additionally, the threshold should be flush to prevent tripping and facilitate smooth wheelchair entry. Lever handles are preferable over knobs. They provide a better grip and are easier to operate for people with limited hand strength. Considering these accessible bathroom dimensions will ensure that the space is functional and inclusive.
Clear Floor Space
Creating an accessible bathroom involves more than just aesthetic considerations; it requires ensuring a clear path for ease of use. To make fixtures like the sink, toilet, and shower easily accessible, it’s crucial to maintain an unobstructed, firm, and slip-resistant floor space around them.
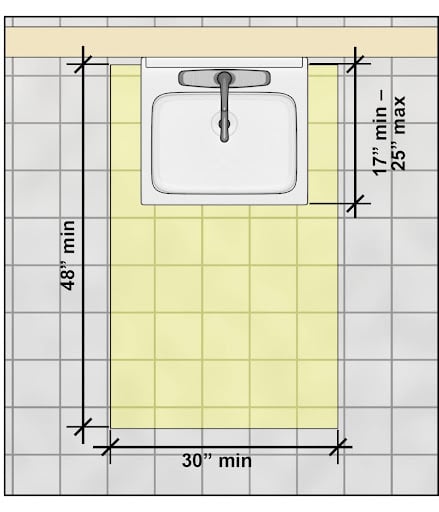
Provide at least 30 × 48 inches of clear space in front of each fixture. This allows users to approach and use the fixtures comfortably, whether in a wheelchair or using other mobility aid devices.
Fixtures and Fittings
Now that we’ve covered the general accessible bathroom dimensions, let’s explore the specifics of bathroom fixtures. Which fixtures you choose and where you place them can make all the difference in creating an accessible and functional space.
Toilets
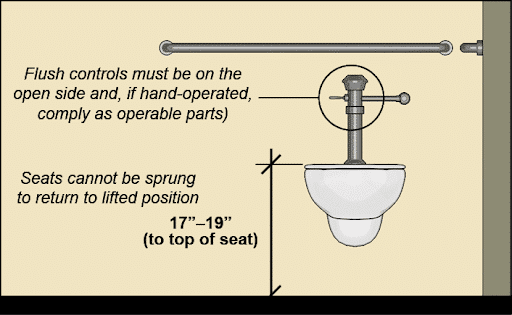
An accessible toilet should be free of clutter. It should have enough space on at least one side for a wheelchair to move close enough for easy transfer. ADA standards mandate toilets to be between 17 and 19 inches from floor to seat. These are often referred to as “comfort height” toilets. Also, make sure that flush controls are located near the open side of the toilet to provide users with easy access.
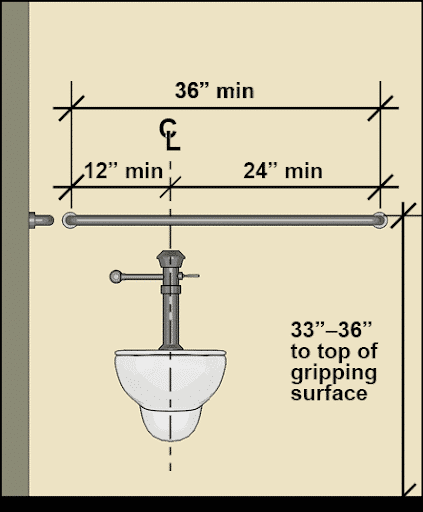
Ideally, grab bars should be placed 33–36 inches above the floor. They should be positioned horizontally on the nearest sidewall and behind the toilet. This setup aids in transferring and provides support while seated.
Sinks and Vanities
To ensure wheelchair users’ access to the bathroom sink, you’ll need to select a design and install it at an appropriate height to provide ample knee space. An accessible sink should be no higher than 34 inches from the floor. It should have a knee clearance of 27 inches high, 30 inches wide, and 17 to 25 inches deep.
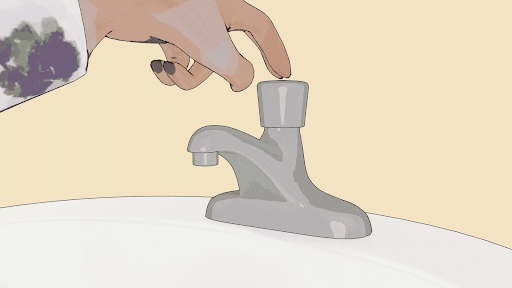
You may also opt for a pedestal sink instead, as it allows for easier wheelchair access. Consider installing long-handle faucets for convenient one-handed operation, avoiding difficult-to-turn knobs. Faucets should ideally be lever-operated, push-type, or electronic, as they require less force and are accessible to everyone.
Lighting
Ample bathroom lighting reduces accidents and is helpful for those with visual impairments. ADA guidelines recommend wall lights be within 4 inches from the wall and mounted between 2 feet 4 inches and 6 feet 8 inches above the floor. Install motion sensors and accessible switches for added convenience, ensuring consistent illumination day or night.
Showers and Bathtubs
When installing accessible showers, size is crucial for easy access, especially if a caregiver is needed. There are two main acceptable styles: roll-in showers and transfer showers.
Roll-in showers, designed for wheelchair users, require a minimum clear shower space of 60 × 30 inches to meet accessible bathroom dimensions. Transfer showers, smaller at 36 × 36 inches, allow users to transfer from a wheelchair to a seat within the shower. The threshold should be a maximum of 0.5 inches to prevent tripping. To enhance usability, add adjustable handheld shower heads with easily operable controls.
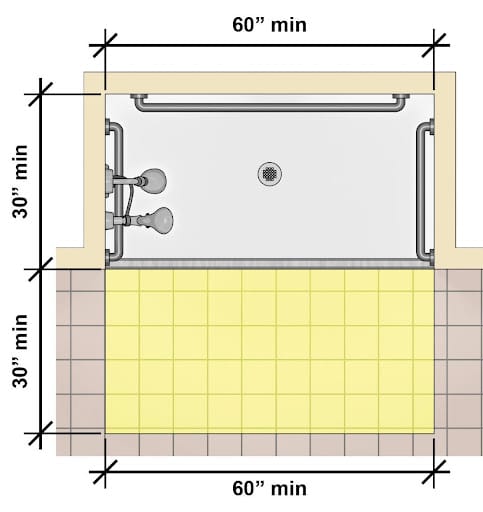
Installing grab bars in showers and bathtubs is the easiest way to add security to prevent falls on slippery surfaces and help with mobility. Typically, grab bars are installed 33–36 inches above the floor. They can be placed on any surface as long as they are securely fastened with screws. These features make the shower more user-friendly and safe.
While showers are safer for those with reduced mobility, bathtubs offer relaxation. To install a bath, ensure a flat, wide entry for accessibility, and place grab bars along the tub’s length for balance. Non-slip shower strips add further safety during baths or showers, reducing the risk of falls. This combination of features creates a comfortable and secure bathing experience for individuals with mobility challenges.
Adding a handheld shower head with anti-scale and pressure balance features helps with flexibility and safety. You might also consider adding a bath lift chair designed to lower and lift users safely. This enhances comfort and independence in bathing and offers features like adjustable seat heights and reclining options.
Contact us to learn more about incorporating accessible features into a bathroom environment to create a more inclusive space.

